AIP Logic Getting started
7/21/2026, 7:17:41 PM · Source
This guide introduces how to access and navigate the AIP Logic interface, configure a basic Logic function using LLM blocks, and utilize the Debugger to examine the LLM's chain of thought for development and testing.
Getting started with AIP Logic – a quick guide to opening the tool, building a Logic function with LLM blocks, and inspecting the LLM’s chain‑of‑thought (CoT) in the Debugger.
Access AIP Logic
AIP Logic can be opened from the platform’s workspace navigation bar or via the quick‑search shortcuts CMD + J (macOS) / CTRL + J (Windows).
You can also create a new Logic function from Files → +New → AIP Logic, as shown below.
 Create new AIP Logic window.
Note: Logic files must be saved in a project folder, not in your home folder.
Application interface
The interface consists of three main components (left‑to‑right in the screenshot):
- Inputs, blocks, and outputs configuration – see the Inputs, blocks, and outputs configuration section.
- Debugger – displays the LLM’s CoT and lets you inspect each step.
- Run panel – runs the Logic, shows recent runs, and lets you create unit tests.
 AIP Logic interface
Workflow overview
A typical workflow:
- Configure inputs (A), blocks (B), and outputs (C) on the left panel.
- Use the Run panel (right) to generate a sample output.
- Inspect the LLM’s chain‑of‑thought in the Debugger and view the steps taken.
- Optionally visualize the final output in the Debugger combined with the Run panel.
- Use the right‑hand sidebar for extra functionality, such as integrating Logic with the Automate application.
Inputs, blocks, and outputs configuration
When you first open AIP Logic, the Run panel appears on the right while three boards appear on the left:
- Inputs – choose an object and its properties (or none).
- Blocks – define the Logic instructions.
- Outputs – specify the desired result of the Logic function.
The output of one block can be fed into subsequent blocks.
 Input, blocks, and Output configuration view.
Inputs
The Inputs board (label “A” in the interface guide) lets you name an input and select its type. Supported types include:
- array, boolean, date, double, float, integer, long, media reference, model, object, object list, object set, short, string, struct, timestamp
Blocks
A Logic function is composed of blocks (label “B”). Common block types:
- Create variable – [create variable]
- Apply action – [apply action]
- Execute function – [execute function]
- Use LLM – [use LLM]
The output of a block can be used by later blocks. Detailed block documentation is available under Blocks.
Outputs
Outputs are defined for each block and for the overall Logic function (label “C”).
- Block output – intermediate values passed between blocks (primitive or object).
- Logic function output – the final value returned by the function, either a Value (primitive/object) or the set of Ontology edits made by the function.
Debugger
After composing a Logic function, click Run on the right. The Debugger opens and displays the LLM’s chain‑of‑thought (CoT).
 Debugger view with example.
Features:
- Expand/collapse block cards
- Clear tool calls
- Review generated prompts for easier interpretation of the CoT
Run panel
The Run panel lets you:
- Execute and evaluate your Logic
- Review recent runs and run history
- Set unit tests
- Launch automations (via Automate)
 Run view with flight example in result box.
At the bottom, select any recent run to view its output and debug log.
 Run and Run history view
Unit tests
Click the unit tests icon ( Unit tests icon.) to save a version of your input for performance evaluation.
 Unit tests examples featuring notional flight changes.
Using a Logic function
Logic functions behave like regular functions on objects (FoO).
-
Back an action – call the Logic function from a Workshop action.
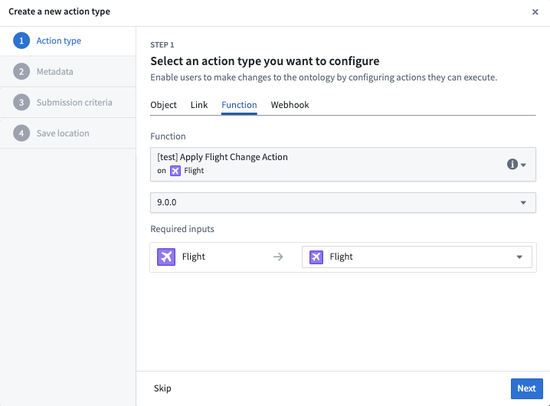 Create a new action type window with function and inputs selected from dropdown menus.
 -
Back a Markdown widget – the Logic function’s output must be a string.
 Example showing Markdown widget setup popover in Workshop application.
 -
Call from other Logic functions – use the Ontology function tool within AIP Logic.
Running a Logic function via the command line
In the Uses tab, copy the generated curl request to run the Logic outside of Foundry. (Not available for Logics that return ontology edits.)
 Command line request
Make Ontology edits using Logic functions
When a Logic function proposes Ontology edits, they appear in the Debugger but are not applied automatically. To apply edits:
-
Call the Logic function from an action or from an automation (create a new automation via the Automations
 Automate icon option).
 -
Ensure the Logic function includes an Apply actions tool inside a Use LLM block, enabling the LLM to edit the Ontology.
 Example showing Apply actions tool with prompt to "Make changes to the flight as described" where an action has been preselected from a dropdown menu.
 -
After finalizing the Logic, select Publish next to Save.
-
Create a new action backed by the published Logic function.
 Example of wrapping your logic function into an action.
 -
Use the new action in a Workshop module to power an operational workflow.
 Workshop configuration panel with Flight Change action selected from dropdown.
Comparison view
The Version history tab lets you compare two Logic versions, highlighting added, removed, or edited blocks.
 Logic comparison
Next steps
If you have access to AIP Logic:
- Experiment with LLM blocks to interact with your Ontology.
- Build a use case tailored to your domain.
- Review the platform’s Functions documentation for deeper integration.
Key takeaways
- AIP Logic is accessed via the workspace bar, quick‑search, or Files → +New.
- The interface centers on Inputs/Blocks/Outputs, a Debugger, and a Run panel.
- Blocks can be chained; their outputs feed subsequent blocks.
- The Debugger visualizes the LLM’s chain‑of‑thought, aiding troubleshooting.
- To apply Ontology edits, embed an Apply actions tool in a Use LLM block and run the Logic from an action or automation.
Learning map
Stage 1: Foundation & Navigation
- Learn to Access AIP Logic: Understand how to launch the application and create new Logic files within a project. This is the entry point to using the tool.
- Explore the Application Interface: Familiarize yourself with the three main components: Inputs/Blocks/Outputs configuration, Debugger, and Run panel, to grasp the overall workflow.
Stage 2: Building Basic Logic Functions
- Understand Inputs, Blocks, and Outputs: Learn how to define various input types, compose Logic using different block types (especially LLM blocks), and specify both intermediary and final outputs. This forms the core of function creation.
- Run and Test Your Logic: Practice executing your Logic functions using the Run panel to generate sample outputs and ensure basic functionality.
Stage 3: Debugging and Iteration
- Utilize the Debugger for Chain of Thought (CoT): Learn to analyze the LLM's CoT in the Debugger to understand its reasoning and identify areas for improvement in your Logic blocks. This is crucial for refining LLM-driven functions.
- Manage Runs and Unit Tests: Use the Run panel to review recent runs, understand output, and set up unit tests to evaluate function performance and ensure consistency.
Stage 4: Integration and Advanced Operations
- Integrate Logic with Ontology Actions: Discover how to use Logic functions to make Ontology edits by backing actions, enabling real-world data manipulation.
- Call Logic Functions in Other Applications: Understand how to integrate Logic functions into Workshop modules (e.g., backing actions or Markdown widgets) or other Logic functions/Functions on Objects for broader platform utility.
Get hands-on — step by step
- Access AIP Logic: Open the Palantir platform workspace, then use
CMD + J(macOS) orCTRL + J(Windows) for quick search and select "AIP Logic", or navigate via the workspace navigation bar. - Create a New Logic File: Once in AIP Logic, select to create a new Logic file. Ensure you save it within a project folder, not your home folder.
- Identify Interface Components: Observe the three main sections: the left panel for Inputs, Blocks, and Outputs; the central Debugger area; and the right Run panel.
- Configure Inputs and Blocks: In the left panel, add an input (e.g., a
stringtype). Then, add a "Use LLM" block. Experiment with a simple prompt within the LLM block. - Define Outputs: Configure the output of your LLM block as the final Logic function output.
- Run the Logic Function: Use the "Run" button in the Run panel on the right sidebar to execute your newly created Logic.
- Examine Chain of Thought in Debugger: After the run completes, open the Debugger (if not already open) and explore the LLM's Chain of Thought (CoT) to see the steps and prompts it used to generate the output.
- Review Run History: In the Run panel, check the "Recent runs" to view past execution results and outputs.
Top 3 sources
- 1Palantir Foundry Documentation: AIP Logic Overview
The official documentation for AIP Logic, covering core concepts, interface, blocks, and integration within the Palantir Foundry platform.
https://www.palantir.com/docs/foundry/logic/overview/
- 2Palantir Foundry Documentation: Functions on Objects
Learn about Functions on Objects (FoOs), which provide programmatic ways to interact with the Ontology and are closely related to how Logic functions are used.
https://www.palantir.com/docs/foundry/functions/overview/
- 3Palantir Foundry Documentation: Automate
Explores the Automate application within Foundry, demonstrating how Logic functions can be used to power automated workflows and apply Ontology edits.
https://www.palantir.com/docs/foundry/automate/overview/
Links are AI-suggested — worth a quick sanity check before diving in.