Claude Code Source Code Architecture Overview
7/12/2026, 10:48:22 PM · updated 7/12/2026, 10:51:26 PM
This article provides an in-depth analysis of Claude Code's layered source code architecture, from startup assembly and the QueryEngine main loop to the tool and command systems, revealing its design essence as an engineering-grade AI Agent platform.
Let's Look at the Overall Diagram First
If you only look at the source directory, it's easy to be intimidated by the large number of files.
But looking at the main relationships, the architecture of Claude Code is not messy; it can be roughly abstracted into the following diagram:

Now a Layering Diagram Closer to the Source Directory
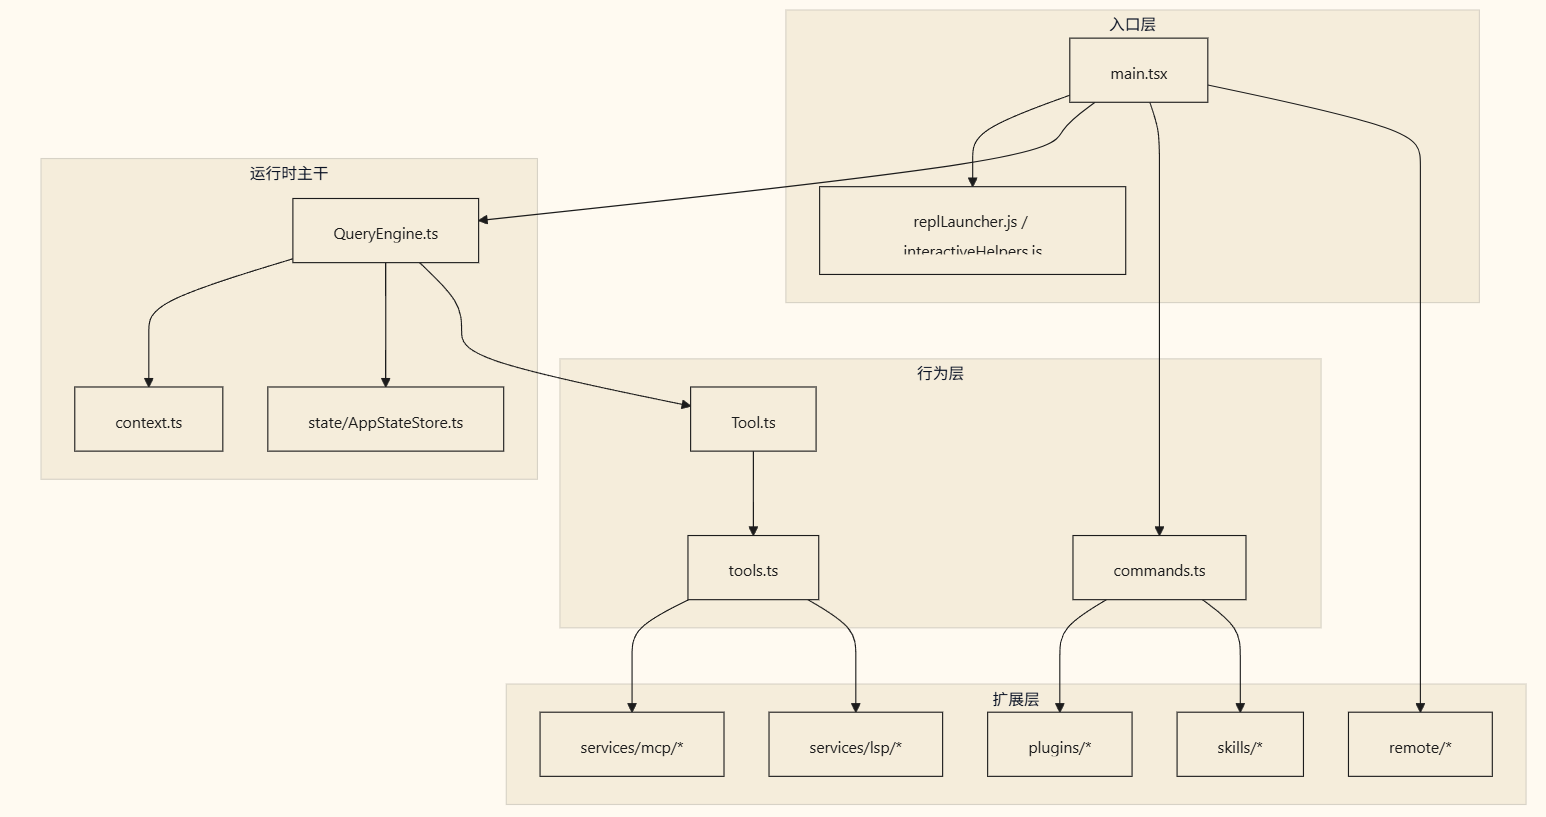
Layer 1: Bootstrapping and Assembly
The responsibility of main.tsx is very heavy; unlike a typical CLI, it doesn't just simply parse parameters and execute a function.
It does a lot of assembly work during the startup phase:
- Pre-warming performance-sensitive modules
- Loading configuration and managed settings
- Initializing authentication, telemetry, and policy restrictions
- Initializing MCP, LSP, plugins, and Skills
- Aggregating commands and tools
- Starting the REPL, non-interactive workflows, or remote sessions based on the mode
Therefore, main.tsx is more like a system bootloader.
Corresponding Source Code Snippet
import { getSystemContext, getUserContext } from './context.js';
import { launchRepl } from './replLauncher.js';
import { getTools } from './tools.js';
import { filterCommandsForRemoteMode, getCommands } from './commands.js';
import { initializeLspServerManager } from './services/lsp/manager.js';
import { initBuiltinPlugins } from './plugins/bundled/index.js';
import { initBundledSkills } from './skills/bundled/index.js';
This list of imports itself contains a wealth of information.
It shows that the entry layer is not just launching a REPL, but is simultaneously assembling:
- Context system
- Tool system
- Command system
- LSP
- Plugins
- Skills
Thus, the actual positioning of main.tsx in the architecture is the "assembly root."
The Most Important Engineering Significance of This Layer
The value of the startup layer is not just "importing things," but rather centrally deciding:
- What form the current session takes
- Which capabilities to enable
- Which states to pre-load
- Which resources to prepare before entering the main loop
Layer 2: The QueryEngine Main Loop
QueryEngine.ts is the heart of Claude Code.
It is responsible for converting a user task into a continuously progressing execution process.
The core objects it manages include:
- Message history
- Tool availability
- Permission denial records
- File cache
- Token and cost statistics
- Abort control
- Session-level state continuity
Without this layer, Claude Code would degrade into "an LLM caller with some tool descriptions."
Corresponding Source Code Snippet
export class QueryEngine {
  private config: QueryEngineConfig
  private mutableMessages: Message[]
  private abortController: AbortController
  private permissionDenials: SDKPermissionDenial[]
  private totalUsage: NonNullableUsage
  private readFileState: FileStateCache

  constructor(config: QueryEngineConfig) {
    this.config = config
    this.mutableMessages = config.initialMessages ?? []
    this.abortController = config.abortController ?? createAbortController()
    this.permissionDenials = []
    this.readFileState = config.readFileCache
    this.totalUsage = EMPTY_USAGE
  }
}
Just looking at these fields, you can tell that QueryEngine manages much more than just "sending requests to the model"; it also includes:
- Historical messages
- Abort control
- Permission denials
- File cache
- Usage statistics
This is a typical session-level runtime, rather than a one-off request handler.

Layer 3: Tool System
Tool.ts defines the tool protocol, and tools.ts is responsible for registering and filtering tools.
The role of this layer is to wrap lower-level capabilities into unified tool interfaces callable by the model, such as:
- Reading and writing files
- Bash / PowerShell
- Search and glob
- Reading MCP resources
- Invoking LSP capabilities
- AskUserQuestion
- Agent / Team / Task-related tools
You can think of it as Claude Code's "action layer."
Corresponding Source Code Snippet
export function getAllBaseTools(): Tools {
  return [
    AgentTool,
    TaskOutputTool,
    BashTool,
    ...(hasEmbeddedSearchTools() ? [] : [GlobTool, GrepTool]),
    FileReadTool,
    FileEditTool,
    FileWriteTool,
    WebFetchTool,
    TodoWriteTool,
    WebSearchTool,
    AskUserQuestionTool,
    SkillTool,
    EnterPlanModeTool,
    ...(isEnvTruthy(process.env.ENABLE_LSP_TOOL) ? [LSPTool] : []),
    ListMcpResourcesTool,
    ReadMcpResourceTool,
  ]
}
This code directly shows that Claude Code's capabilities are not abstract imagination, but a clearly registered set of tools.
From here, you can see very intuitively:
- File capabilities
- Shell capabilities
- Search capabilities
- Interaction capabilities
- Skill capabilities
- LSP and MCP capabilities
Layer 4: Command System
In addition to model-callable tools, Claude Code also has a large number of explicit commands.
commands.ts aggregates many slash commands, such as:
- Configuration-related
- Session-related
- Review-related
- Plugin-related
- MCP-related
- Plan-related
- Status and statistics-related
The command system serves "explicit user control," while the tool system serves "implicit model execution," each having distinct responsibilities.

Layer 5: Context and State
The reason this system can "seem to understand the project" lies not just in its tools, but also in its context and state management:
context.tsis responsible for preparing context such as Git status,CLAUDE.md, date, etc.AppStateStore.tsmanages UI and session states like REPL, tasks, notifications, remote connections, MCP, plugins, etc.
One is responsible for "what to show the model," and the other is responsible for "the current state of the interface and session."
Corresponding Source Code Snippet
export const getSystemContext = memoize(async (): Promise<{ [k: string]: string }> => {
  const gitStatus =
    isEnvTruthy(process.env.CLAUDE_CODE_REMOTE) ||
    !shouldIncludeGitInstructions()
      ? null
      : await getGitStatus()

  return {
    ...(gitStatus && { gitStatus }),
  }
})
A key fact can be seen here:
Claude Code actively injects project contexts like Git status into subsequent conversations, which is one of the major reasons it "seems to understand the project."
Layer 6: Extensibility
From the directory structure, we can see that Claude Code has long ceased to be a closed tool, taking on a platform-like form:
services/mcp/*services/lsp/*plugins/*skills/*tools/AgentTool/*remote/*
These modules signify that Claude Code is not just executing built-in tools, but is continuously evolving into an "extensible engineering agent platform."
Why is the Directory Size So Large?
When you see how many directories this repository has, don't rush to think that its "design is messy."
A more reasonable understanding is that Claude Code simultaneously bears four types of system responsibilities:
- Terminal interactive application
- Agent runtime
- Tool and command platform
- External extension integration layer
When you stack these four types of responsibilities together, the directory size naturally won't be small.
How to Distinguish the Main Architecture Line from Secondary Branches
When reading, it is recommended to divide the directories into two categories:
Core Files
main.tsxQueryEngine.tsTool.tstools.tscommands.tscontext.tsstate/AppStateStore.ts
Extension Files
services/*components/*commands/*tools/*plugins/*skills/*remote/*
By grasping the core first and then looking at the extensions, efficiency will be much higher.
The Correct Order When Reading the Source Code
If you just browse aimlessly through the massive directory, it is easy to get lost.
A more recommended order is:
main.tsxQueryEngine.tsTool.tstools.tscommands.tscontext.tsstate/AppStateStore.ts- Then proceed to
services/mcp,services/lsp,plugins, andskills
This path is much closer to the system's actual backbone.
Summary
The source code architecture of Claude Code can be summarized in one sentence:
Use
main.tsxto assemble configurations, commands, tools, context, and extension capabilities, and then useQueryEngineto drive the entire engineering task loop.
In the next few articles, we will follow this main line to break things down step by step.
Learning map
Stage 1: CLI and Agent Basics (Beginner)
- Understand Node.js CLI Execution Mechanism: Learn how TypeScript compiles and interacts in the terminal, which is the foundation for reading the Claude Code entry point.
- Study the Agent Loop (ReAct Pattern): Understand how the model drives tasks through "thought-action-observation", corresponding to the underlying logic of the QueryEngine.
Stage 2: Core Architecture Deconstruction (Advanced)
- Analyze QueryEngine.ts: Focus on learning session state, context caching, token statistics, and interruption control mechanisms, to understand how it maintains long conversations.
- Master Tools and Command Systems: Differentiate between implicitly called Tools and explicitly entered Commands, and learn the registration and isolation design of both.
Stage 3: Platformization and Ecosystem Integration (Mastery)
- Explore MCP and LSP Services: Study how Claude Code extends context through the Model Context Protocol, and how it integrates with LSP to provide precise code navigation and review.
- Implement Custom Skills/Plugins: Practice writing custom extensions based on architectural specifications to enhance the Agent's domain-specific capabilities.
Get hands-on — step by step
-
Build a Minimalist Agent Runtime Environment: Create a new TypeScript project, initialize package.json, and install the official AI SDK dependencies.
-
Implement a Simplified Tool Protocol: Write a Tool interface containing name, description, inputSchema, and execute functions. Implement a simple FileReadTool basic tool.
-
Write a Simple QueryEngine Loop: Create a QueryEngine class to maintain the messages array. In the run method, pass the list of tools to the large language model. If the model returns a tool call, execute the tool locally, append the result back to messages, and loop this process.
-
Simulate Context Injection: Write a getSystemContext function to automatically read the local project's Git Status and concatenate it into the system prompt, verifying whether the model can automatically perceive the local project's status.
Top 3 sources
- 1Claude Code Official Guide
Anthropic 官方关于 Claude Code 的使用与集成指南,深入理解其终端交互与工作流。
https://docs.anthropic.com/en/docs/agents-and-tools/claude-code
- 2Model Context Protocol (MCP) Docs
了解 MCP 的开放标准,掌握 Claude Code 如何通过统一协议连接外部数据源与本地工具。
https://modelcontextprotocol.io
- 3Anthropic TypeScript SDK
官方 TypeScript 客户端,包含基础的 API 调用与工具调用定义,是理解 Claude Code 通信层的基础。
https://github.com/anthropics/anthropic-sdk-typescript
Links are AI-suggested — worth a quick sanity check before diving in.